Operating System:
• Windows
• Wine (macOS 10.15+ and Linux)
• Mac (up to macOS 10.14 Mojave)
iGetter For Windows FAQ's:
General Questions:
• How to get started with iGetter Download Manager?
• How to enable Instant File Initialization?
• What connection type to choose when asked?
• Are there any other options that I could set manually?
• Does iGetter support Socks firewalls?
• How to load iGetter minimized at Windows startup?
• Can iGetter scan finished files for viruses?
• Where is the iGetter profile folder located?
• Can I use a username and password in the URL?
Browsers (Windows):
• What browsers does iGetter support?
• How to integrate iGetter with Microsoft Edge?
• How to integrate iGetter with Chrome?
• How to integrate iGetter with Firefox?
• How to integrate iGetter with Opera, Vivaldi and other Chromium based browsers as well as SeaMonkey?
• What to do if iGetter extension shows error, that it can't communicate with iGetter app?
• How to disable iGetter browser extension for a particular URL?
Bugs:
I think I found a bug, what should I do?
Error Messages:
• The FTP Proxy returns an authentication error?
• Network error 268435556 ?
• Network Error 61 ?
• Network error 64 ?
• The total file size grows every time iGetter resumes it?
• iGetter finished my download, but the file is too small (less than 10K)?
• 401 Bad authentication error?
Other:
• The question I'm looking for is not here. What should I do?
General questions:
Q: How to get started with iGetter Download Manager?
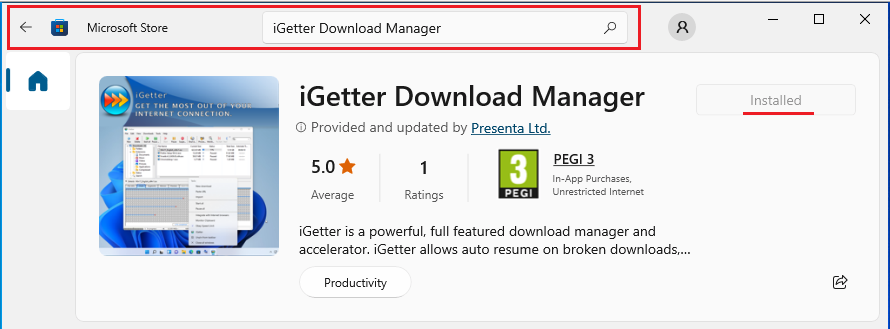
A: You can install iGetter Download Manager from the Microsoft Store or www.igetter.net site. To install from the Microsoft Store app, you need to search for "iGetter Download Manager" in the search box and then click on the "Install" button. When the app is installed the "Install" button will change to "Installed".
To start the iGetter app, after the installation:
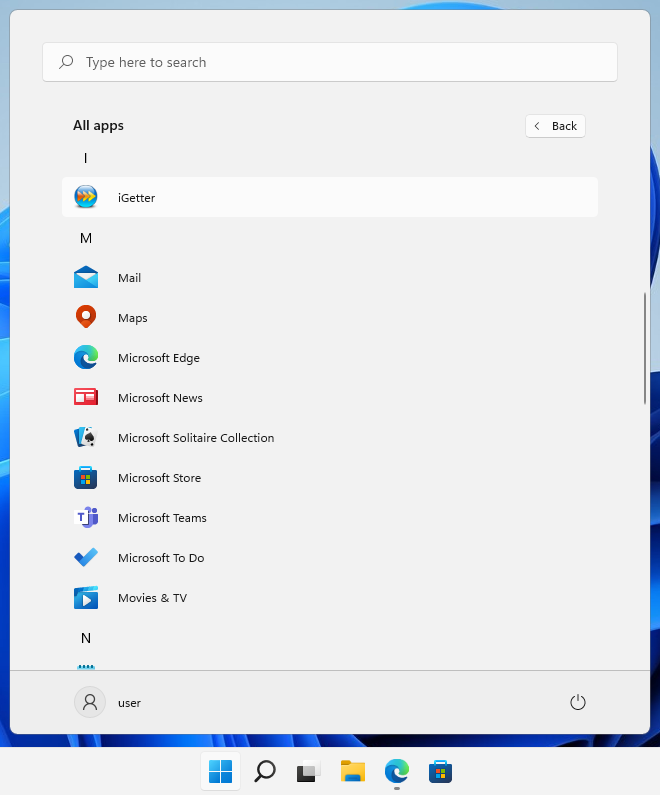
1. Select Start  from the taskbar.
2. Search for the app by typing "iGetter" in the search box or find iGetter in the list of apps. It should appear in Recommended (Recently Added) section on the Start menu, if not click on the "All apps" button in Windows 11 and scroll down the app list.
• When you start iGetter you just need to add a download link for downloading. This can be done from your browser with the help of iGetter browser extension or by copy&paste or drag&drop of a download link to iGetter.
• iGetter browser extension is available for: Microsoft Edge, Firefox, Chrome, Opera, Vivaldi and other browsers. Read more.
• If iGetter suits your needs, you should consider purchasing it. Trial version will show a splash screen with 15 sec. delay at every startup. Registering iGetter will give us the opportunity to continue its development. To purchase iGetter, select "Register" function in the Help menu.
Q: How to enable Instant File Initialization?
A: When you start a download, iGetter creates an empty file and then fills it up with download content. But due to security concerns, NTFS file system initializes the empty file by filling with zeros the allocated space on the HDD. iGetter v3.1.0 introduces a new feature called Instant File Initialization, that allocates disk space without filling that space with zeros and file is initialized instantaneously. This feature is disabled by default, because Microsoft require a special privilege. The created file may contain existing data left on the disk from previously deleted files. You may decide if increased performance outweighs the security risk.
In order to enable Instant File Initialization you can do one of the following:
- Run iGetter as administrator. This is the only option for Windows Home users.
- Windows Pro users may add their current user to the Perform Volume Maintenance Tasks security policy:
1. Open the Local Security Policy application (secpol.msc).
2. In the left pane, expand Local Policies, and then select User Rights Assignment.
3. In the right pane, double-click Perform volume maintenance tasks.
4. Select Add User or Group and add your current user.
5. Restart your computer.
6. Start some large download in iGetter and look in the Segments tab panel, transfer log of the first segment, for the text Instant File Initialization: enabled.
Q: What connection type to choose when asked?
A: The "Connection type" option (also at iGetter options, Acceleration panel) should match as near as possible your actual Internet connection's download speed. To select a proper connection type, you need to visit a speed test site (search the Internet for "speed test"). Test your connection to some server i.e. in US. If your download speed is for example 5.43 Mbps choose "6Mb Cable/DSL" in iGetter.
Note that iGetter measures speed in Bytes per second (B/s) which is 8 times less than bits per second (bps or b/s). For example, if iGetter shows a download speed of 3.75 MB/s, this is equal to 30 Mbps.
Q: Are there any other options that I could set manually?
A: Since v2.6 you can use the following additional options in the iGetter_Prefs.xml file located in the "%APPDATA%\iGetter" folder. To open that folder, click on the Windows "Start" button, select "Run..." (or hold both the "Windows" and "R" keys on your keyboard) and type in:
%APPDATA%\iGetter
• Options that you can put after the "<Dlg>" tag:
- Turn Target Icon transparency off
<IconT>0</IconT>
- Minimize the main window on close
<CloseX>0</CloseX>
- Select History after completion - on
<SelH>1</SelH>
- Disable Instant File Initialization, if feature is enabled with special privilege
<IFI>0</IFI>
• Options that you can put after the "<iGetter>" tag:
- File extensions that Site Explorer will process and show in the HTML preview:
<SiteDir> htm , html , php , php3 , php4 , php5 , phtml , jsp , jhtml , js , shtm , shtml , stm , shtm , ssi , asp , aspx , vbs , inc , cgi , lasso , cfm , cfc , cfml , vtm , vtml , wml , pwml , xhtml , htc , xml , rss , m , do , adp , py , md5 , msg , </SiteDir>
- Windows Media Player and QuickTime extensions that iGetter will show in the History media preview:
<MediaExt> avi , asf , wm , wma , wmv , wmd , ogg , ogm , mkv , mka , asx , wax, m3u , wpl , wvx , wmx , dvr-ms , mid , rmi , midi , ape , mpeg , mpg , m1v , mp2 , mpa , mpe , ifo , vob , wav , snd , au , aif , aifc , aiff , wma , mp3 , jpg , jpeg , </MediaExt>
<MediaQTExt> qt , qtl , mp4 , 3gp2 , 3g2 , sdv , 3gp , adts , aac , cdda , amc , caf , gsm , pntg , pict , qtif , sdp , 3gpp , mov , dif , dv , mac , pct , pic , pnt , qht , qhtm , qti , sd2 , </MediaQTExt>
Q: Does iGetter support Socks firewalls?
A: Yes. iGetter supports Socks firewalls versions 4, 4a and 5. For Socks 5 iGetter uses Basic authentication.
Q: How to load iGetter minimized at Windows startup?
A: You can create a shortcut of iGetter (C:\Users\<user>\AppData\Local\Programs\iGetter) to your Desktop or some other folder.
1. Right-click on the iGetter shortcut and select Properties.
2. Choose Run: Minimized.
3. Drag and drop the shortcut to the Start menu -> Programs -> Startup.
Q: Can iGetter scan finished files for viruses?
A: iGetter lets you choose the virus scanner program that you have on your computer. You may select the program at the iGetter Options, "Advanced" panel.
Q: Where is the iGetter profile folder located?
A: iGetter stores the downloads, history and preferences data files in the following location:
C:\Users\<UserName>\AppData\Roaming\iGetter
When you reinstall Windows or move iGetter on another machine you can backup and restore the iGetter profile folder to keep your current preferences, downloads and history lists.
To open that folder, click on the Windows "Start" button, select "Run..." (or hold both the "Windows" and "R" keys on your keyboard) and type in:
%APPDATA%\iGetter
Q: Can I use a username and password in the URL?
A: iGetter will accept URLs with the following format:
http://username:password@www.xxxx.com/...
ftp://username:password@ftp.xxxx.com/...
Please, avoid using slashes "/", at signs "@" or colons ":" in passwords.
The best way to use username and password for FTP and HTTP servers is to enter them at the iGetter Options, "Site Manager" panel or individually at "New Download" (Ctrl+N) window, Advanced tab panel.
Browsers:
Q: What browsers does iGetter support?
A: iGetter v3 integrates with Internet Browsers by a browser extension (available for Microsoft Edge, Chrome, Chromium based browsers and Firefox).
To install iGetter extension, select "Integrate with Internet browsers" Tools menu command and click on "Microsoft Edge", "Chrome" or "Firefox" buttons. Then install the iGetter extension following the instructions on the opened web page. For Opera, Vivaldi and other Chromium based browsers, you may need to follow some additional steps. If extension returns some error about missing NativeMessaging host visit this FAQ for more info.
Q: How to integrate iGetter with Microsoft Edge?
A: iGetter integrates with Microsoft Edge by a browser extension. To install iGetter extension, select "Integrate with Internet browsers" Tools menu command and click on the "Microsoft Edge" button. Then install the iGetter extension following the instructions on the opened web page. Finally, enable iGetter extension in Microsoft Edge when prompted.
You may also install iGetter extension from the Edge Add-ons Store.
You can verify if iGetter extension is enabled at Edge's Extensions Manager. To use iGetter extension in private mode you have to turn on the "Allow in InPrivate" option.
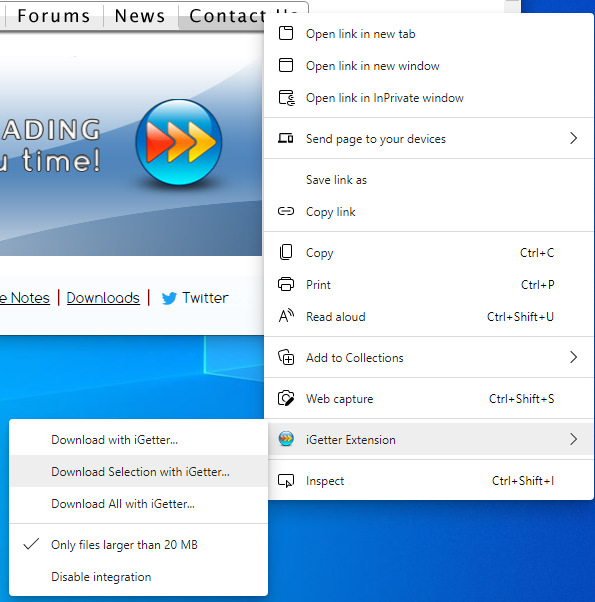
iGetter extension adds several contextual menu commands as well as automatic downloading with iGetter when you click on a download.
To download any file just choose "Download with iGetter..." using the contextual menu with any hyperlink on the web page.
There is an extra contextual menu function named "Download all with iGetter...". Using this function, you can process all links of a current web page to the iGetter queue.
With "Disable integration" and "Only files larger than 20 MB" (ON by default) contextual menu commands, you can control extension's automatic downloading (that sends file downloads to iGetter instead of your browser).
Q: How to integrate iGetter with Chrome?
A: iGetter integrates with Chrome by a browser extension. To install it, either follow the link to Chrome WebStore or select "Integrate with Internet browsers" Tools menu command in iGetter app and click on the "Chrome" button. Then install the iGetter extension following the instructions on the opened web page. Finally, enable iGetter extension in Chrome when prompted.
You can verify if iGetter extension is enabled at Chrome's Extensions Manager (type "chrome://extensions" in address bar). To use iGetter extension in incognito mode you have to turn on the "Allow in incognito" option.
Latest version of iGetter extension is based on Manifest V3 platform and requires Chrome (or other Chromium based browser) v102 or later. To work properly, extension requires an optional permission to access additional downloads data. When permission is granted, extension will not transfer to iGetter app, downloads that use HTTP POST method or files started with "Save link as..." contextual menu command. Please, allow access to downloads data for all websites when asked. You may also switch this option at Chrome Extensions panel > iGetter Extension > Site access > "On all sites". Without this permission, all downloads will transfer to iGetter app (if integration is enabled), but those that use POST method will return an error when started in iGetter.

- iGetter Extension v3 supports several keyboard shortcuts, that can be changed from Chrome Extensions panel > Hamburger icon > Keyboard shortcuts:
1. Disable integration, until closing the browser (Ctrl+Q)
2. Enable integration (Ctrl+Comma)
3. Disable integration (Ctrl+Period)
- The new version no longer transfers PDF files to iGetter app, since Chrome opens such files by default. You can use "Download with iGetter" contextual menu command on a download link, if you want to download PDFs with iGetter.
iGetter extension adds several contextual menu commands as well as automatic downloading with iGetter app when you click on a download.
To download any file just choose "Download with iGetter..." using the contextual menu with any hyperlink on the web page.
There is an extra contextual menu function named "Download all with iGetter...". Using this function, you can process all links of a current web page to the iGetter queue.
With "Disable integration" and "Only files larger than 20 MB" (OFF by default) contextual menu commands, you can control extension's automatic downloading (that sends file downloads to iGetter instead of your browser).
Q: How to integrate iGetter with Firefox?
A: iGetter integrates with Firefox by a browser extension. To install it, either follow the link to AMO (addons.mozilla.org) or select "Integrate with Internet browsers" Tools menu command in iGetter app and click on the "Firefox" button. Then install the iGetter extension following the instructions on the opened web page. Finally, enable iGetter extension in Firefox when prompted.
You can verify if iGetter extension is enabled at Firefox's Add-ons Manager (Ctrl+Shift+A). To use iGetter extension in private mode you have to turn on the "Run in Private Windows" option.
Latest version of iGetter extension is based on Manifest V3 platform and requires Firefox v115 or later. To work properly, extension requires an optional permission to access additional downloads data. When permission is granted, extension will not transfer to iGetter app, downloads that use HTTP POST method or files started with "Save Link As" contextual menu command. Please, allow access to downloads data for all websites when asked. You may also switch this option at Firefox Add-ons panel > iGetter WebExtension > Permissions.. Without this permission, all downloads will transfer to iGetter app (if integration is enabled), but those that use POST method will return an error when started in iGetter.

- iGetter Extension v3 supports several extension shortcuts, that can be changed from Firefox Add-ons panel > Gear icon > Manage Extension Shortcuts:
1. Disable integration, until closing the browser (Ctrl+Q)
2. Enable integration (Ctrl+Comma)
3. Disable integration (Ctrl+Period)
- The new version no longer transfers PDF files to iGetter app, since Firefox opens such files by default. You can use "Download with iGetter" contextual menu command on a download link, if you want to download PDFs with iGetter.
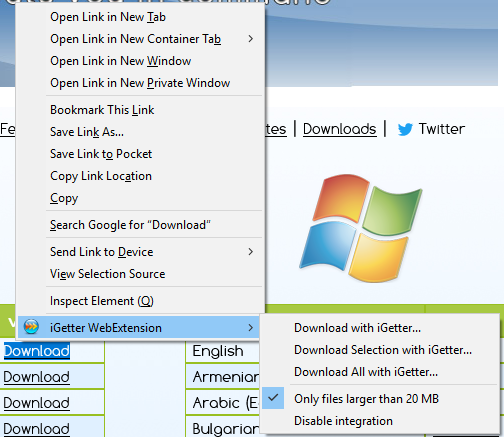
iGetter extension adds several contextual menu commands as well as automatic downloading with iGetter when you click on a download.
To download any file just choose "Download with iGetter..." using the contextual menu with any hyperlink on the web page.
There is an extra contextual menu function named "Download all with iGetter...". Using this function, you can process all links of a current web page to the iGetter queue.
With "Disable integration" and "Only files larger than 20 MB" (OFF by default) contextual menu commands, you can control extension's automatic downloading (that sends file downloads to iGetter instead of your browser).
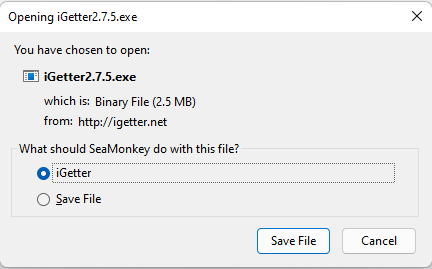
Q: How to integrate iGetter with Opera, Vivaldi and other Chromium based browsers as well as SeaMonkey?
A: iGetter integrates with Opera, Vivaldi and other Chromium based browsers by a browser extension available on the Chrome Webstore.
You may install iGetter extension from this link.
Optionally you can turn on "Allow in private mode" option in the browser's Extensions page.
SeaMonkey is a successor of Mozilla and currently uses code from Firefox ESR. It still supports XUL based extensions. iGetter XUL extension for SeaMonkey provides better control over each download. You may install the extension from this link..
Q: What to do if iGetter extension shows error, that it can't communicate with iGetter app?
A: iGetter extension for Firefox, Microsoft Edge, Chrome and other Chromium based browsers, needs to find installed iGetter app in order to communicate with it. This is done by a special NativeMessagingHosts entry in Windows registry. iGetter v3 installer automatically adds required entries for Microsoft Edge, Chrome and Firefox browsers. So, you just need to reinstall iGetter v3 to fix this error.
Opera, Vivaldi and other Chromium based browsers, work with the iGetter extension from the Chrome WebStore. They look at Chrome's NativeMessagingHosts entry, so they should work without any error. But if a Chromium based browser shows this error, then you need to search for "NativeMessaging" in the browser's documentation and follow their instructions.
Read more info about NativeMessaging in Chrome's documentation.
Q: How to disable iGetter browser extension for a particular URL?
A: iGetter browser extension adds several contextual menu commands. You can use "Disable integration" and "Only files larger than 20 MB" to control extension's automatic downloading (that sends file downloads to iGetter instead of your browser).
Bugs:
Q: I think I found a bug, what should I do?
A: Please see the Bugs section of iGetter FAQs for this bug. If it isn't there you may visit our bugs report page for iGetter here.
Error Messages:
Q: The FTP Proxy returns an authentication error?
A: If you have filled out the FTP Proxy User Name/Password fields in the iGetter options, Proxy panel, iGetter will use the 'User after logon' authentication method. If not, iGetter will use 'User without logon' method. If the FTP proxy returns authentication error, you may ask the server administrator to enable one of these authentication methods. Also, you may try checking your FTP Proxy User Name/Password to make sure you have filled in the proper fields.
Q: Network error 268435556 ?
A: Network error 268435556 means: "Operation timed out. Server not responding."
This error may occur if you have set to 0 the "Timeout connection attempts after '#' sec." option at the iGetter Options, Connections panel. This option determines how long iGetter to wait for a response (by default it is 60 sec.).
Q: Network Error 61 ?
A: Network error 61 means "Connection refused". This error may appear in two cases. First if you use a Socks proxy enter the authentication info in the iGetter Options, Proxy panel. Second, your network connection is not configured properly or there is a firewall blocking iGetter to connect the Internet.
Q: Network error 64 ?
A: Network error 64 means: "Host is down - a socket operation failed because the destination host is down. A socket operation encountered a dead host. Networking activity on the local host has not been initiated". This error occurs mainly if the timeout is reached.
There are several reasons for this error: 1. The destination host is really down. To check if this is true try to download http://www.igetter.net/downloads.html. If you receive the same error skip to the next point. 2. Check if you haven't blocked iGetter with a firewall.
Q: The total file size grows every time iGetter resumes it?
A: Some FTP servers respond incorrectly to ftp commands for resuming. iGetter sends a REST 1 to see if the server supports resuming, then sends the REST 'numbytes' to resume at the right point. Some servers don't handle the second REST command. If this problem occurs, see if you can find the same file on a different server.
Q: iGetter finished my download, but the file is too small (less than 10K)?
A: Some HTTP servers return error messages in the form of an HTML page instead of in the HTTP Header response. iGetter copes with this problem checking the date and size of the started real file, however, in such cases the first attempt to download your file will fail. If this problem occurs try to restart the download.
Q: 401 Bad authentication error?
A: There are several possible reasons for such an error:
1. Check your User Name and Password in the "Item Settings" dialog, Advanced tab panel.
2. If you use a HTTP proxy, check the proxy user name and password at iGetter Options, Proxy panel.
3. iGetter uses Basic HTTP Authentication, but your HTTP Server or Proxy doesn't support this method of authentication. If this is the case, try asking the administrator of the server to enable Basic authentication for you.
Other:
Q: The question I'm looking for is not here. What should I do?
A: If you are a registered user of iGetter contact us directly using the contact form.
iGetter FAQ's For Wine 7+ on macOS and Linux: | To Index |
Q: How to use iGetter on macOS 10.15 Catalina or later and Linux?
A: iGetter v3.4.0 added support for Crossover 22.0 or later (Wine 7+) that is available for macOS 10.14 or later, and Linux (i.e. Ubuntu, Mint). In Crossover you need to install latest iGetter version for Windows or just search for "iGetter" in Crossover apps:

Crossover has a 14-day free trial. It is a paid open-source product (look for discounts). Codeweavers contribute to the open-source command line software Wine, which you may find on Gitlab/Github or install it through MacPorts or Homebrew.


Q: How to integrate iGetter (installed in Crossover 22.0+/Wine 7+) with native Firefox, Chrome and Microsoft Edge (installed on macOS and Linux)?
A: You need to install iGetter v3.4.0 or later in Crossover 22.0+/Wine-stable/staging 7+.
Start iGetter and select "Integrate with Internet browsers" Tools menu command. It will install required json files for the NativeMessagingHost integration with browsers.
Integration will work only if you see this alert:
"iGetter created Native messaging host files. Click on the "Other" button to install iGetter browser extension."
If you don't see this message, then enable Z: drive in winecfg and try "Integrate with Internet browsers" function again.
Finally, install the iGetter extension and enable it in your browser when prompted:
1. iGetter integrates with Chrome, Opera, Vivaldi and other Chromium based browsers by a browser extension available on the Chrome Webstore.
2. For Microsoft Edge install it from the Edge Add-ons Store.
3. For Firefox install iGetter extension from the AMO (addons.mozilla.org).
iGetter FAQ's For Mac (up to macOS 10.14 Mojave): | To Index |
General questions:
• What are the System Requirements?
• macOS 10.14 shows some alerts, what's their meaning?
• What connection type to choose when asked?
• How do I uninstall iGetter for MacOS X ?
• Does iGetter support Socks firewalls?
• Can iGetter scan finished files for viruses?
• Can I use a username and password in the URL?
Browsers (Mac):
• How to integrate iGetter with Safari?
• How to integrate iGetter with Chrome?
• How to integrate iGetter with Firefox?
• My browser doesn't restore after uninstalling iGetter?
Bugs:
• I think I found a bug, what should I do?
Error Messages:
• The FTP Proxy returns an authentication error?
• The total file size grows every time iGetter resumes it?
• iGetter finished my download, but the file is too small (less than 10K)?
• The HTTP server returns a 'Bad authentication' error?
General Questions:
Q: What are the System Requirements?
A: iGetter v2.9.7+ supports Mac OS X 10.6 up to and including macOS 10.14 "Mojave".
For older systems, it should work (not tested) on Mac OS X 10.2 - 10.5 (Intel or PowerPC).
Apple removed support for 32-bit apps in macOS 10.15, so iGetter v2.x will not run on Catalina or later. We can't promise a 64-bit version anytime soon.
Q: macOS 10.14 shows some alerts, what's their meaning?
A: On macOS 10.13.4+ and 10.14, when you first start iGetter, a one-time alert is shown about 32-bit app deprecation. Apple completely deprecated 32-bit apps such as iGetter v2 in macOS 10.15 and we can't promise a rewritten 64-bit version anytime soon. You can read their statement:
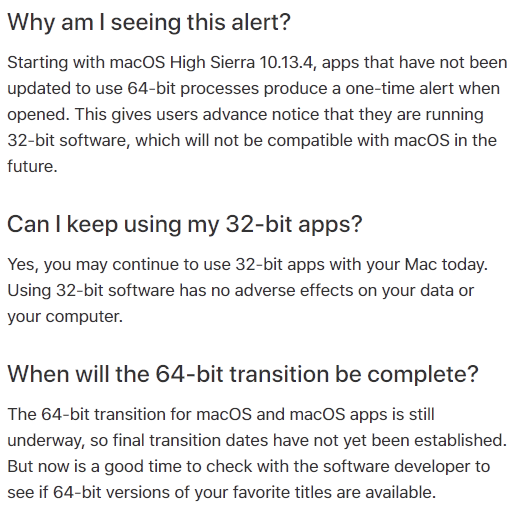
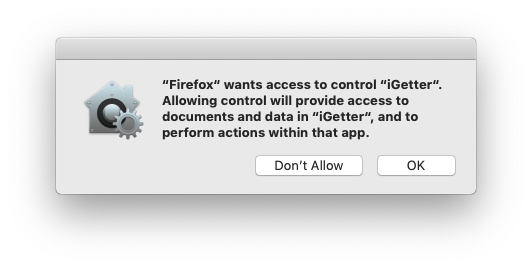
In addition, you may see the following one-time alert when you use iGetter integration with browsers i.e. "Download (all) with iGetter" contextual menu command. You have to confirm that alert, otherwise downloads will not be transferred to iGetter.
Similar alert appears when you use iGetter, that it wants access to control Finder. iGetter sends some non-critical notifications to Finder i.e. refresh of download's icon or storing download URL in the file comments. If you refuse that alert iGetter should work, but some unexpected behavior may appear, such as finished downloads may still open in iGetter.
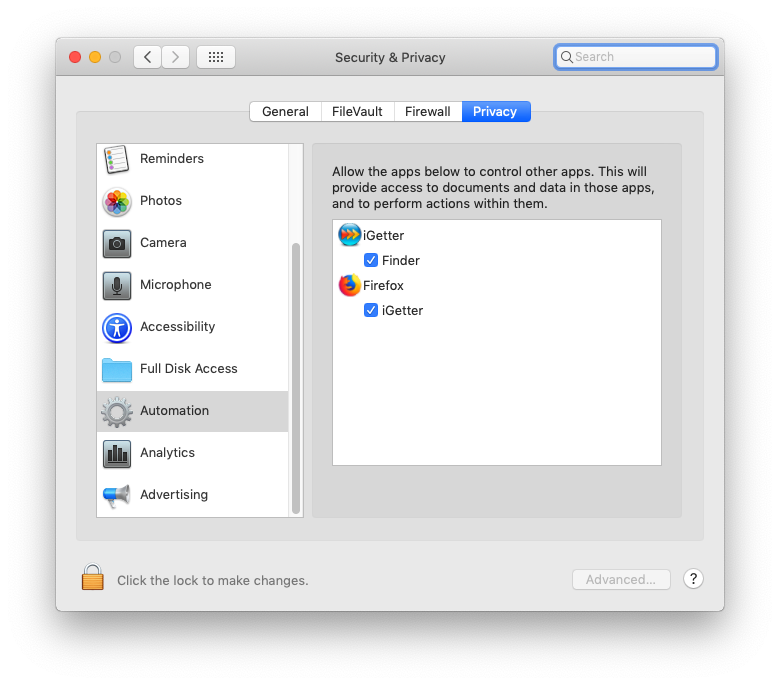
If you accidentally refuse these alerts, you may enable them later at System Preferences > Security & Privacy > Privacy panel > Automation.
Q: What connection type to choose when asked?
A: The "Connection type" option (also at iGetter preferences, Acceleration panel) should match as near as possible your actual Internet connection's download speed. To select a proper connection type, you need to visit a speed test site (search the Internet for "speed test"). Test your connection to some server i.e. in US. If your download speed is for example 5.43 Mbps choose "6Mb Cable/DSL" in iGetter.
Note that iGetter measures speed in Bytes per second (B/s) which is 8 times less than bits per second (b/s). For example, if iGetter shows a download speed of 1.25 KB/s, this is equal to 10 Mbps.
Q: How do I uninstall iGetter for Mac OS X?
A: To remove iGetter integration with browsers (which is off by default):
1. First, quit all opened browsers (i.e. Safari, Chrome, Firefox, etc.). For example to quit Safari you need to select Safari icon in the Dock and use Menu Safari -> Quit (Cmd+Q). (If you restart [or log out] your machine turn off "Reopen windows when logging back in" option on the restart alert).
2. Do one of the following:
• Run the iGetter uninstaller app OR start iGetter app and turn off both "Install iGetter Browser Extension" and "Install iGetter Browser Plugin" Tools menu options.
• OR manually remove the following file (hint: type "iGetter" in the search field of a Finder window):
/Users/<your user>/Library/Internet Plug-Ins/iGetter Plugin
In Chrome, disable iGetter Extension at Chrome's menu Window > Extensions (or type "about:extensions" (without quotes) in Chrome's address bar).
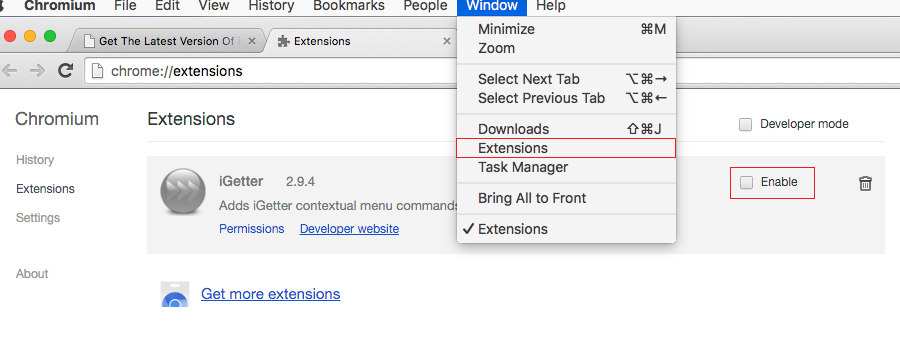
In older versions of iGetter you have to remove also:
/Users/<your user>/Library/InputManagers/iGetterIMBundle
/Users/<your user>/Library/Contextual Menu Items/iGetterCMPlugIn
Preferences and app files are here:
/Users/<your user>/Library/Preferences/com.presenta.iGetter.plist
[on OS X 10.10+ use "defaults delete com.presenta.iGetter.plist" in the Terminal app]
/Users/<your user>/Library/Application Support/iGetter
<Applications>/iGetter
Since user Library folder is hidden, to open it, first show hidden files with Shift+Cmd+. (Shift+Cmd+period). Alternatively on macOS 10.7 and up, hold down the Option key when using the Finder's Go menu. The user library folder is listed below the current users home directory. Or you can use your Terminal app (/Applications/Utilities folder). Start Terminal and paste the following line (then press Return):
open ~/Library/
Q: Does iGetter support Socks firewalls?
A: Yes. iGetter supports Socks firewalls versions 4, 4a and 5. For Socks 5 iGetter uses Basic authentication.
Q: Can iGetter scan finished files for viruses?
A: iGetter lets you choose the virus scanner program that you have on your computer. You may select the program on the 'Advanced' tab panel in Preferences.
Q: Can I use a username and password in the URL?
A: iGetter will accept URLs with the following format:
http://username:password@www.xxxx.com/...
ftp://username:password@ftp.xxxx.com/...
Please, avoid using slashes "/", at signs "@" or colons ":" in passwords.
The best way to use username and password for FTP and HTTP servers is to enter them in iGetter preferences > Site Manager or New URL dialog > Advanced panel.
Browsers:
Q: How to integrate iGetter with Safari?
A: iGetter v2.9.7 ships with a new Safari App Extension, using the new API introduced in Safari 12. The app extension replaces the previous .safariextz extension for the recent Safari versions. The functionality with the "Download with iGetter...", etc., contextual menus is the same in the new extension.
Since Safari 12+ removed support for NPAPI plugins, and didn't introduce new extension API for download observing (i.e. when a download link is clicked and the download is started in the browser), currently no such functionality is present in the new extension.
In addition, you can add a new download by using some of the following methods:
1. Drag&drop a download link from Safari to the iGetter Dock icon.
2. Copy some link in Safari (through contextual menu command "Copy Link") then paste it in iGetter by menu Edit > Paste (Cmd+V) or menu File > New URL (Cmd+N).
3. You can use "Process web page..." function at iGetter Tools menu to extract all web page links. It's similar to "Download all with iGetter" contextual menu command.
These are the steps to integrate iGetter v2.9.7 with Safari v12 or later:
1. Quit Safari from menu Safari > Quit (Cmd+Q).
2. Turn on "Install iGetter Browser Extension" option at iGetter preferences, Integration panel.
3. Open the browser, then Safari Preferences' Extensions tab and enable the "iGetterExtension" if it's not enabled. This needs to be done only once, and Safari will remember the extension state through all future iGetter app updates.
These are the steps to integrate iGetter v2.9.6 with Safari up to v11:
1. Quit Safari from menu Safari > Quit (Cmd+Q).
2. Turn on both "Install iGetter Browser Extension" and "Install iGetter Browser Plugin" (or "Add Contextual menu support for Internet browsers" and "Integrate with Internet browsers" in older iGetter versions) options at iGetter preferences, Integration panel.
3. If you use some of the recent versions of Safari, iGetter will warn you that Safari will be started in order for the extension to be installed. When you confirm, iGetter extension will be automatically added to Safari.
If for some reason iGetter extension is NOT listed in Safari > Preferences > Extensions panel:
1. Click on the following link in Safari:
www.igetter.net/iGetterExtension.safariextz
2. Open Safari downloads window as shown on the screenshot. Then double click on the downloaded extension file and when prompted click on the "Install" button:
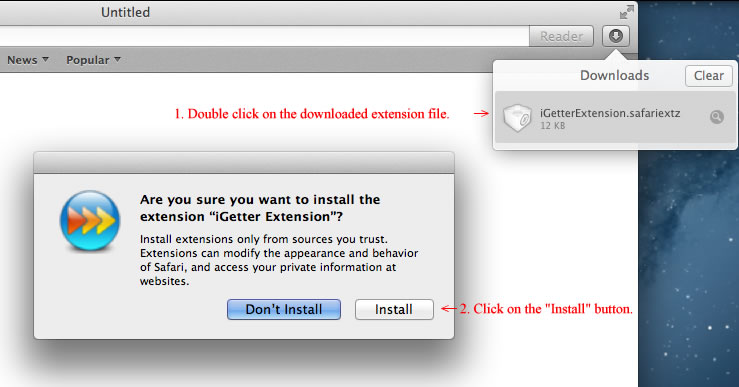
3. iGetter extension should appear in Safari preferences, Extensions panel and you need to enable it:
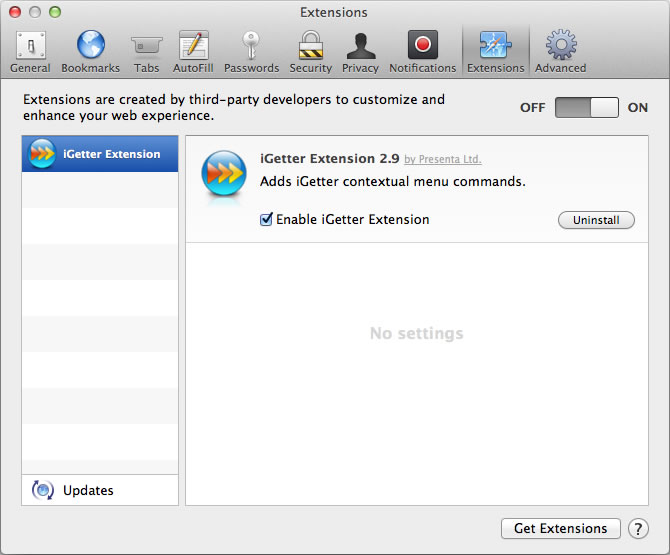
4. In addition, you need to enable iGetter plugin. To do so, choose Safari > Preferences > Security > Internet plug-ins (or Manage Website Settings in older versions). Click Website Settings and select iGetter Plugin. In the When visiting other websites pop-up menu, choose Allow Always.
5. You may also check if "iGetter Plugin" and "iGetterScriptablePlugin" are listed at Safari > Help > "Installed Plugins" page:
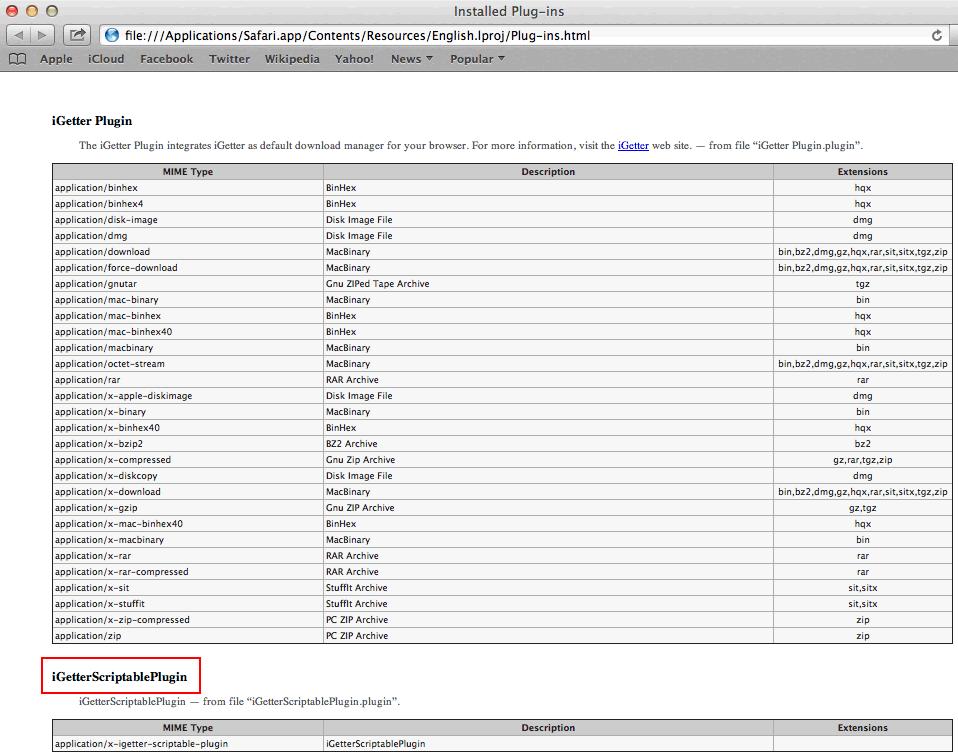
6. The result should be working iGetter CM commands in Safari:
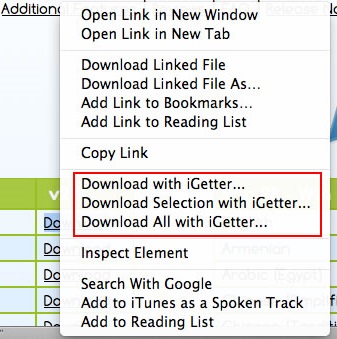
Q: How to integrate iGetter with Chrome?
A: iGetter integrates automatically with Chrome v18 and up. You need to turn on "Install iGetter Browser Extension" (or "Add Contextual menu support for Internet browsers" in older iGetter versions) option at iGetter preferences, Integration panel. Then restart Chrome and when prompted enable iGetter extension.
You can verify if iGetter extension is enabled at Chrome's Extensions Manager (menu Window > Extensions or type "chrome://extensions" in the address bar). To use iGetter extension in incognito mode you have to turn on the "Allow in incognito" option.
Don't delete iGetter extension from the Chrome's Extensions Manager (you may only disable it, if you wish), but always use the iGetter options available at iGetter preferences, Integration panel. Otherwise iGetter will not be able to install/uninstall/update its extension in Chrome any longer. You have to update it manually using the link below.
However, if you've deleted iGetter extension from the Chrome's Extensions page, you may install it manually. To do so, go to Chrome WebStore iGetter extension's page and install the extension. In order for extension to work you also need to turn on "Install iGetter Browser Extension" (or "Add Contextual menu support for Internet browsers" in older iGetter versions) option at iGetter preferences, Integration panel.
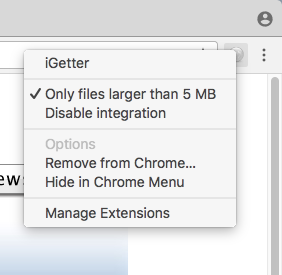
In Chrome v31 and up, you can temporarily disable automatic interception using Chrome's contextual menu > "iGetter" > "Disable integration" command. Also, you can disable integration only for small files by selecting "Only files larger than 5 MB" option (which is OFF by default).
In older versions of Chrome up to v44, iGetter integrates with Chrome by a browser plugin that catches mouse clicks of hyperlinks. In this case you need to turn on "Install iGetter Browser Plugin" (or "Integrate with Internet browsers" in older iGetter versions) option at iGetter preferences, Integration panel. Then you need to allow iGetter plug-in(s). To do so, go to the following address in Chrome, find all iGetter plug-ins and check the box next to "Always allowed":
chrome://plugins
Q: How to integrate iGetter with Firefox?
A: iGetter v2.9.7 integrates automatically with Firefox. You need to turn on "Install iGetter Browser Extension" option at iGetter Preferences, Integration panel. Then restart Firefox and when prompted enable iGetter extension. You can verify if iGetter extension is enabled at Firefox's Add-ons Manager (Cmd+Shift+A).
Firefox v74+ doesn't support installation of add-ons distributed through sideloading, which means that iGetter app can't install automatically its extension. So, after turning the integration option on, you also need to install the iGetter xpi extension from this link. When prompted add the iGetter extension.
In Firefox v57+, iGetter v2.9.7+ installs a new add-on called "iGetter Extension", which uses the new WebExtensions API adopted by Firefox. The old XUL based add-on also called "iGetter Extension" will be installed as well, but Firefox v57+ will disable it and mark it as "Legacy". In Firefox up to v56, only the XUL based "iGetter Extension" will be enabled.
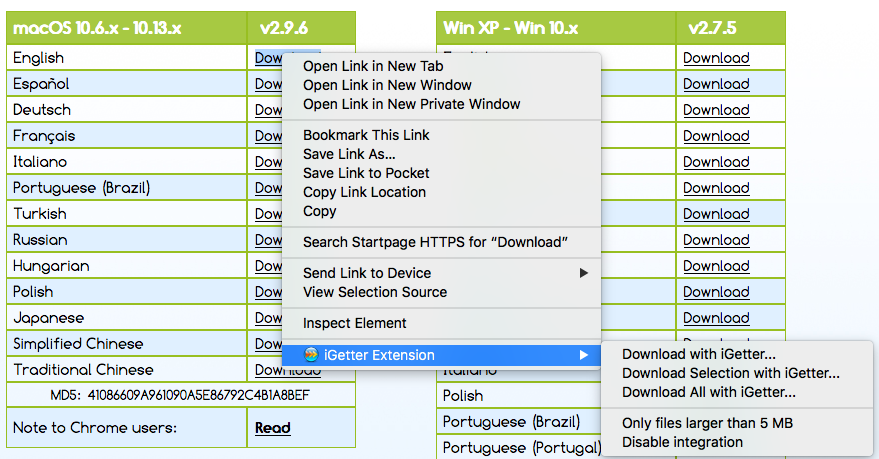
In the new WebExtension, you can temporarily disable automatic interception using Firefox's contextual menu > "iGetter" > "Disable integration" command. Also, you can disable integration only for small files by selecting "Only files larger than 5 MB" option.
Q: My browser doesn't restore after uninstalling iGetter?
A: Since iGetter version 1.6 integration with browsers is switched off by default. To restore your browser just turn off both "Install iGetter Browser Extension" and "Install iGetter Browser Plugin" (or "Add Contextual menu support for Internet browsers" and "Integrate with Internet browsers" in older iGetter versions) options at iGetter preferences, Integration panel. If you've removed iGetter without turning off the integration function then follow these instructions
Bugs:
Q: I think I found a bug, what should I do?
A: Please see the Bugs section of iGetter FAQs for this bug. If it isn't there you may visit our bugs report page for iGetter here.
Error Messages:
Q: The FTP Proxy returns an authentication error?
A: If you have filled out the FTP Proxy User Name/Password fields in Internet Config, iGetter will use the 'User after logon' authentication method. If not, iGetter will use 'User without logon' method. If the FTP proxy returns authentication error, you may ask the server administrator to enable one of these authentication methods. Also, you may try checking your FTP Proxy User Name/Password to make sure you have filled in the proper fields.
Q: The total file size grows every time iGetter resumes it?
A: Some FTP servers respond incorrectly to ftp commands for resuming. iGetter sends a REST 1 to see if the server supports resuming, then sends the REST 'numbytes' to resume at the right point. Some servers don't handle the second REST command. If this problem occurs, see if you can find the same file on a different server.
Q: iGetter finished my download, but the file is too small (less than 10K)?
A: Some HTTP servers return error messages in the form of an HTML page instead of in the HTTP Header response. iGetter copes with this problem checking the date and size of the started real file, however, in such cases the first attempt to download your file will fail. If this problem occurs try to restart the download.
Q: The HTTP server returns a 'Bad authentication' error?
A: There are several possible reasons for such an error. First, check your User Name/Password on the 'Log In' tab panel in the Preferences. Second, if you use a HTTP proxy, you may check User Name/Password in the 'Authentication HTTP Proxy' on the 'Proxy' tab panel in Preferences. The last reason may be that iGetter uses Basic HTTP Authentication, but your HTTP Server or Proxy doesn't support this method of authentication. If this is the case, try asking the administrator of the server to enable Basic authentication for you.


